今回のノート風の罫線の実装は、背景が単色の場合と、そうではない場合の2通りを紹介しています。
背景が単色の場合はcssのみで実装できますが、
そうでない場合(グラデーションや背景画像の場合)はjavascriptを併用して実装します。
背景が単色の場合
背景が単色でない場合はcssのみで実装できて比較的簡単です。
See the Pen campus note1 by takblog (@blanks-site) on CodePen.
scssやsassを使用している人用でmixinを作ったので、必要な人は使ってください。
@mixin campus($color:#ff0000,$bgcolor:#fff,$width:10px,$weight:2px,$gap:10px,$lineheight:28px){
  background-image:
    linear-gradient(to top,
      rgba($bgcolor,1) 0%,
      rgba($bgcolor,1) #{($lineheight - $weight)/$lineheight*100%},
      rgba($bgcolor,0) #{($lineheight - $weight)/$lineheight*100% + 1},
      rgba($bgcolor,0) 100%),
    linear-gradient(to right,
      rgba($color,1) 0%,
      rgba($color,1) #{$width/($width + $gap)*100%},
      rgba($color,0) #{$width/($width + $gap)*100% + 1},
      rgba($color,0) 100%);
  background-repeat: repeat-y,repeat;
  background-size: 100% $lineheight , #{$width + $gap} $weight;
}
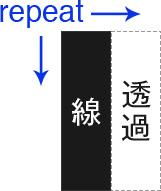
これの罫線はbackground-imageのliner-gradientを2つ重ねることで罫線を実装しています。
1つのliner-gradientは破線を作り、もう1つのliner-gradientは破線の一部を隠すためにあります。
下記イメージを参考にしてください。


上記のイメージを見れば、なぜ背景色が単色の時しかこのcssが使えないかが、わかるかと思います。
破線を作るために、背景色で破線のliner-gradientの一部を隠しています。
ちなみにliner-gradientで破線が作るイメージは以前の記事で説明しています。
 マーカーや破線などのテキスト装飾をcssのみで表現
またこの罫線を実装する上で大事なのはline-heightです。
今回作ったmixinはline-heightをpxでの指定にしています。(remでも可)
そこを注意して使用してください。
背景が単色でない場合
背景が単色でない場合はjavascriptを使用して破線を作ります。
次の例では背景がグラデーションの場合です。
See the Pen campus note2 by takblog (@blanks-site) on CodePen.
これはテキストのline-heightごとに破線を作るiタグをpositionで設置しています。
正直、力技感があるので他にもっとスマートな方法がある方は教えてほしいです。
実装したcssとjavascriptは次のものです。
css
.note {
  position: relative;
}
.note .line {
  background: linear-gradient(to right, white 0%, white 37.5%, rgba(255, 255, 255, 0) 38.5%, rgba(255, 255, 255, 0) 100%) repeat-x left bottom/8px 1px;
  display: block;
  width: 100%;
  height: 1px;
  position: absolute;
  left: 0;
}
javascript
const createCampusNote = () =>{
  const campusNote = document.getElementById("campusNote");
  const lineheight = 40;
  const lineClass = "line";
  for( let top = 0; top <= campusNote.clientHeight + lineheight ; top += lineheight ){
    const i = document.createElement("i");
    i.classList.add(lineClass);
    i.style.top = `${top}px`;
    campusNote.appendChild(i);
  }
}

createCampusNote();
簡単にjsの説明をします。
2行目、campusNoteは破線を設置する要素をidで指定しています。
3行目、lineheightはcampusNote内のテキストのline-heightの値を入れます。
4行目、破線になるラインのclassを入れます。


